Sheet Pan Chicken Fajitas- Happy Cinco de Mayo!

IMG_7067IMG_7069
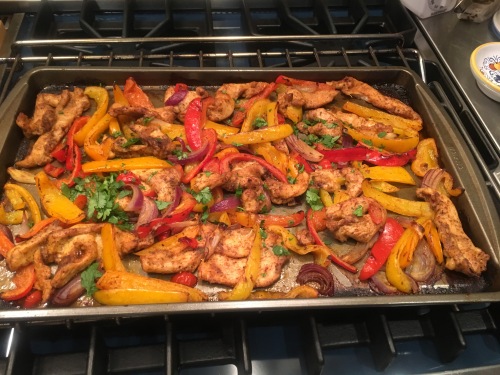
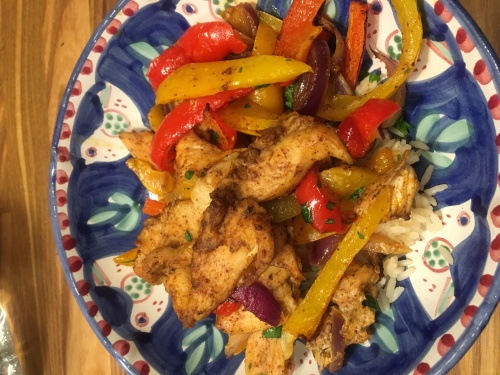
More of my favorite way to cook with Chicken Fajitas made on the Sheet Pan . I made this the other night and it is the easiest and most delicious meal. I am always experimenting with making Chicken Fajitas in new ways and trying to keep the oil down. If you use too little oil they come out tasting dry and that’s no good so use the 3-4 tablespoons of olive oil that I suggest.  This is what I did and I served with small soft tortillas and you can provide any fixings you like. I also served over rice in a bowl which is how I like to eat my fajitas. Obviously what you do with them is totally up to you! A little sour cream and guacamole never hurt anyone either. And buy some tortillas and you have perfection on a plate.

And if you’re ready to fire up the outside grill check out my recipe for chicken fajitas on the grill!

*it is important that all veggies be cut up into fairly uniform sizes this will help cooking process and timing

Enjoy!

Happy Cinco de Mayo !

Ingredients:

1 1/2 lbs. of chicken breast tenders– or just cut some chicken cutlets into strips

1 yellow bell pepper –sliced into 1/4″ slices

1 red bell pepper–sliced into 1/4″ slices

1 orange bell pepper–sliced into 1/4″ slices

1 small red onion–sliced into 1/4″ slices

3-4 Tablespoons of Extra Virgin Oil –now I have tried 2 Tablespoons and it was a little dry so use your own discretion here –depending on how much chicken you’re using and you’ll want a light glaze all over the chicken and veggies

1 teaspoon of kosher salt –this was enough for us but again use your own discretion

several turns of the pepper mill — freshly ground black pepper always works best

2 teaspoons of chili powder

1/2 teaspoon of garlic powder

1/2 teaspoon of onion powder

1/2 teaspoon of ground cumin

1/2 teaspoon of smoked paprika

Lime for squeezing at the end

*fresh chopped cilantro for garnish and delicious flavor if you like it

*warmed tortillas–if you like

Directions:

Preheat oven to 425 degrees

In a large bowl , combine onion, bell pepper, chicken strips, olive oil, salt and pepper and all the spices. Start with 2 Tbsp. of Olive Oil and add more . I really felt it needed more than 2 Tbsp.

Toss well and combine and allow to sit for a while before cooking. I find that the longer it sits the better it tastes. I prepped and let it sit for an hour or so.

Spray a baking sheet with non stick cooking spray

Spread chicken and onions and everything on baking sheet

Cook at 425 degrees for about 20 minutes, if you’d like to use a meat thermometer here chicken should be 165 degrees. After 20 minutes I turned the oven to broil and cooked for additional 2-4 minutes just letting the veggies get some nice color. Watch it carefully to make sure it doesn’t burn.

I served in bowls over rice with warm mini tortillas and sour cream and guacamole.

*should serve 3-4 nicely with the rice and sides

Enjoy!

Chicken Meatballs

I made these delicious meatballs last Sunday night and they are from my Italian Wedding Soup recipe. I served with my Sunday Night Sauce ( Marinara) and Spaghetti. These are delicious, moist meatballs that I bake in the oven. I don’t fry these . I highly recommend these for pasta and of course in soup!

Perfect Meatballs and Spaghetti but made with Chicken and Sausage . If you can find Chicken Sausage use it and if you can find ground chicken made with dark meat I would recommend using that. I couldn’t find dark meat ground chicken so used what I could find and I used Hot Spicy Pork Sausage because I couldn’t find Chicken Sausage here in Colorado.

This is how I make my Chicken Meatballs. Enjoy!

Ingredients:

1 lb. Ground chicken — I prefer ground chicken to ground turkey but you can use it as well. Again if you can get ground dark meat chicken use that.

1/2 lb. Chicken Sausage, or Pork Sausage and you can use Sweet or Hot

3 slices Bread for Bread Crumbs — using the food processor I remove crusts and using steel blade make crumbs — app. 1 cup you can use whole wheat bread or white bread — whatever you have in the house — of course you can use regular Italian Flavored Bread Crumbs but I find the bread crumbs that you buy are a little dryer than the fresh bread crumbs. I also would substitute Panko bread crumbs which work out well.

2 -3 Garlic Cloves – minced app. 2 teaspoons

1/4 cup grated Parmesan Cheese

3 Tablespoons Milk — I have 2% and it’s fine so whatever you have in the house

1 Egg – lightly beaten

1 teaspoon kosher salt and 1/2 teaspoon freshly ground black pepper ( coarse black pepper)

Directions:

Pre-heat the oven to 350 degrees.

I use Silicone liners for baking sheet but if you don’t own these absolutely fantastic Silpat liners use parchment paper or just use cooking spray, or parchment paper or aluminum foil.

Place all ingredients for meatballs in a large bowl and mix till just mixed with a fork or your “clean” hands. I use a teaspoon as a guide and made 1- 11/2″ balls. Don’t over mix and when you make the balls don’t pack super tight. Just loosely roll balls with wet hands. Place onto cookie sheet and bake for 25-30 minutes, until cooked through and lightly browned. Set aside and add to your Sunday Night Sauce or whatever sauce you’re making and place in sauce before you’re ready to eat and heat through.

That’s it! Enjoy!

Easy Israeli Salad

This salad is so delicious and fresh and works so well with grilled chicken, fish or really any protein.

I just love it for lunch or dinner and it’s so easy that anyone can do it. Add in feta cheese, olives, or canned chick peas to add to this wonderful deliciousness.

Whatever and whenever you decide to serve this it will be most wonderful.

Just a word about making ahead… I chopped and diced all the vegetables and put in a bowl and put in the fridge. I juiced my lemon and had it set aside. Right before serving I added olive oil and lemon juice stirred it up well and tasted for salt and pepper.

If you add oil and lemon juice too soon it will be very soggy and I don’t like it that way at all. So just have it all ready to serve and add dressing right before.

Ingredients;

this is what I used feel free to substitute or add in whatever you’d like. ( Canned Chick Peas are also delicious in this) Olives, Scallions, Feta Cheese, whatever you feel like.

1 Large Seedless Cucumber or remove the seeds from a seeded one or just keep the seeds if you don’t care

1 box grape tomatoes halved

1 yellow pepper, diced or an orange one. I used orange and yellow about 1/2 and 1/2

1/2 cup diced red onion

2 Tbsp. Fresh Parsley , chopped

3 Tablespoons Lemon Juice

2-3 Tablespoons Olive Oil– I used 3 but you can start with 2 add the salt and pepper and add for more flavor after

Kosher Salt and Freshly Ground Black Pepper

Directions:

In a large bowl, toss together all the vegetables. Add the lemon juice, olive oil and chopped parsley and mix thoroughly to coat.

Season with Salt and Pepper to your liking. Serve cold or at room temperature. I like it cold but it’s delicious either way.

Green Goddess Salad

I first came upon this recipe from Melissa Benishay on Instagram . It is simple , delicious and nutritious. I make it my way which means I pretty much follow her recipe but add chicken, chopped bacon (sometimes), feta, scallions and cucumbers. I also will add chopped up jalapeños for a spicy kick and avocado would be perfect as well. You can make this completely vegan of course but I just like to zuzh it up a bit. Add whatever you like and make it your way. Enjoy!

The ingredients are interesting and you may need to buy a few of these items. For the dressing

Lemons — which give it the fresh taste and the acid it requires

Olive Oil– for the good Fat

Rice Vinegar– a bit of sweet flavor and tang

Shallot– for the sweeter onion flavor

Garlic– because it’s garlic– need I say more

Basil–for that pesto like consistency and flavor

Spinach– for extra nutrients and a lot of green color and don’t tell my hub

Nutritional Yeast– I know I know why???? Because it adds cheesy like consistency and B12 vitamins –it’s kind of like powdered cheese and full of flavor but vegan and has now become a shelf staple in my house for vegan cheese sauces, vegan dips, soups, scrambles, stews and you get the drill.It’s super nutritious and full of protein, B Vitamins, and anti-oxidents.

Walnuts– a nutty base

Salt– to pull it all together and highlight all the layers of flavors and way to bland with no salt

*you’ll need a blender for this one

You can make the dressing ahead like I do in the morning or the day before and it will keep in the fridge for 2-3 maybe 4 days.

Salad Dressing Ingredients:

juice of 2 lemons

1/4 cup olive oil

2 Tbsp. Rice Vinegar

2 largish cloves of garlic

1 smallish shallot

1/3 cup chives

1/4 cup walnuts, cashews, or nut of your choice — I always have chopped walnuts so that’s my nut of choice

1 cup fresh torn Basil Leaves

1/3 cup Nutritional Yeast– I got mine at Trader Joes but you can get this in almost any supermarket

1 Teaspoon Kosher Salt

For the Salad:

I like 1 head ofIceberg Lettuce chopped up and finely diced or you can use a head of green cabbage

3-4 mini cucumbers finely diced–optional see above paragraph on ingredients

1/4 cup chives, finely diced — also optional I used green onions/scallions tonight — use what you have even red onion diced is fine

1 bundle green onions / scallions

Directions:

Place all salad ingredients in a large bowl once they’re chopped up

Add all liquid dressing ingredients to a blender give it a whirl, and then add dry dressing ingredients and blend until smooth.

Yummmmmmmm and Thank You to Melissa Benishay or Baked by Melissa as most of you know

Matzo Brei –Savory Style

This is a delicious way to make a meal with eggs and matzo. Sometimes we eat it for dinner and it’s just sort of perfect. Real comfort food for us.  I always loved Matzo Brei since I was a little girl, and I always wondered why it is that we only eat this delicious concoction during Passover.  It’s such a delicious treat why don’t we eat it more often? In our house we usually eat it till the matzo runs out. Usually for the week of Passover, then we stop. It’s so good. Everyone has their own little special spin on it.  Before I met Joel I always ate my matzo brei sweet with maple syrup sort of a matzo french toast. Joel loves it crispy and salty with a lot of pepper and since I know him he always asks for it this way , I sort of grew to love it this way as well. What’s not to love?  You definitely don’t have to be Jewish to love Matzo Brei. This is how we make it around our house.

Ingredients:

*serves 2 just barely (can and should be doubled)

3 Sheets of Matzo broken into little pieces

2 Large Eggs

Salt and Pepper

2 Tablespoons Vegetable Oil to cover bottom of pan — but usually 2 Tablespoons is about right

Directions:

Break the matzo into little pieces and place in a bowl. Cover with very hot water from tap. Let it stand for a couple of minutes, and then drain it. ( I usually put a plate over bowl and pour out all the water) Beat Eggs in another bowl, season with salt and pepper. Use your own discretion here, Joel likes it with a lot of salt and pepper. Wait a few minutes so matzo isn’t very hot before adding the eggs then combine the eggs with the drained Matzo till a batter forms. Heat the vegetable oil in a large frying pan over medium -high heat — make sure oil is very hot . I carefully  add the matzo mixture to the hot oil  and start to fry it up scrambling it as I go, we like it in little pieces. ( you can make this batter into small pancakes as well and just fry up until golden brown) I cook it till it is all fryed up and crispy. It should cook up pretty quickly if the oil is hot enough. You can serve it with less salt and pepper and put jam on the side, maple syrup on it, cinnamon , whatever you like! Matzo Brei is awesome even when you feel like you can’t face another piece of matzo.

Marcy’s Matzoh Crunch ( like candy)


Many years ago I made this recipe and it was so awesome that it’s been part of our Seder ever since. It’s easy to make and really delicious to eat.  My gf Marcy ( who is a great cook) says she must always supply it for her kids, and she keeps in containers in  the refrigerator and sends them home with it ( even better) this is the stuff that I find deadly to keep around. It’s candy, and fun to make with your kids or grandkids. You can use white chocolate, M & M’s , or toasted almonds/pecans /walnuts etc. or stick with recipe as it is.

 Thanks for sharing  the recipe Marcy.

Happy Passover!

Ingredients:

4 – 6 unsalted matzoh sheets

1 cup unsalted butter or margarine

1 cup brown sugar, firmly packed

3/4 cup chocolate chips or semi-sweet chips you can use white chips as well

*nuts if you’d like sprinkled on top (almonds/walnuts etc.) or colored sprinkles are fun ! 

Directions:

Preheat oven to 375 degrees

Line a cookie sheet with foil and cover bottom of pan with baking parchment on top of foil. ( this is important b/c mixture is very very sticky) Line bottom of pan evenly with matzoh sheets, cutting extra pieces of matzoh to fit on the cookie sheet as even as possible. Combine margarine/butter and brown sugar in a heavy bottomed saucepan. Cook over medium heat, stirring constantly. Remove from heat and pour over matzoh. Place in oven and reduce heat to 350 degrees.  Bake for 15 minutes watching to make sure the mixture is not burning. Remove from oven and sprinkle chocolate chips on top. Let stand 5 minutes, then spread melted chocolate over matzoh after you spread melted chocolate sprinkle with whatever toppings you like — I like colored sprinkles and chopped pecans . While still warm, cut into squares or odd shapes and put in refrigerator until set. Chocolate will get hard. I think it’s better to go with the “odd shapes” as it may be hard to cut perfectly square. You can use white chocolate, and if you’d like sprinkle nuts on top as I mentioned above.

Once it’s completely cooled down you can put into containers and store it will keep for a while. So you can definitely make this recipe ahead of time.

My Favorite Macaroons–Traditional Style for Passover

macaroons for passover

I am not sure why I only make these macaroons during Passover. They are definitely my favorites; they are very easy to make, look totally professional, and are the Passover cookie in my book. These can be made ahead of time and stored. I usually make a few days before the Seder because I dip them in melted chocolate (just the tops). You don’t have to dip, you can leave plain. I dip up to 1/2 the macaroon in the chocolate. They are sweet and crunchy on the outside, and moist and chewy on the inside. After Passover, if there are any left over, I freeze them. Cannot have them lying around. Of course you may make these any time of year…they are always welcome on the menu.

*When dipping, just turn macaroon upside down (with top part into the chocolate). I usually go just a bit more than the top (probably 1/2 the macaroon into the chocolate). Use as much or as little as you like.

*just a little note, silpat is awesome to use for this recipe instead of parchment paper. You must cool completely before trying to lift off the paper. Also before you dip into chocolate I like to cool down completely.

This could be a fun recipe to do with your kids. A little messy but whatever — desperate times call for desperate measures right? They may not come out uniform but the kids could have fun making them and dipping them.

Stay Safe and Be Smart

Ingredients:

3  large egg whites (When I bake, I always leave eggs out so that they are at room temp.)

1/2  cup sugar

1/4 teaspoon salt

1 package (14 oz.) sweetened, flaked coconut ( I like this Angel Flake Baker’s Brand, but they’re all fine)

*1 package semi-sweet chocolate chips (You can really use any semi-sweet chocolate to melt. It’s just easy with the chips.)

Directions:

Preheat oven to 350 degrees. Line a baking sheet with parchment paper (you can use non stick cooking spray, like Pam, but I just line with parchment, which works really well).

In a large bowl, whisk together egg whites, sugar and salt until frothy. With a fork, stir in coconut until moistened.

Using a level tablespoon (measuring ones are perfect), pack the mixture into the spoon, so all macaroons are equal size. Drop mixture onto prepared sheet (cookies will not spread). Bake until golden brown, about 25 – 30 minutes. Towards the end, check on them to be sure they don’t burn. I make a little peak with my fingers on the cookies before I bake them (this makes for easier dipping). You can also just leave the top round — this is perfectly fine.

*To melt chocolate on stove top: I bring a small saucepan of water to a rolling boil, and on top of it put a small stainless (oven proof) bowl filled with the chocolate.( works like a double boiler if you don’t have one) When it completely melts, take off heat. Once macaroons are completely cool, you can dip the tops. Just make sure chocolate and macaroons are cooled off first. Just dip top of cookie in chocolate and place on a plate to cool. When I am all done, I refrigerate the macaroons to set the chocolate. You can leave in fridge until you are ready to serve and take out with enough time to bring to room temp. Before serving, I usually use a cool cookie sheet with parchment paper to cool off cookies once they’ve been dipped.

*should yield about 20 – 25 cookies. You can double if you’d like.

Karyn’s Cranberry Apple Crisp for Passover

photo (37)Remember that fabulous cranberry apple crisp we made for Thanksgiving? Well, here it is for Passover made with matzoh farfel! Perfect side dish for Passover as well, or use for dessert. My family likes to eat this as part of the meal, but do whatever you like. You can even make this in little ramekins and do individual crisps if you like. Once again, this is from Karyn, who deserves full credit in my book!

*just got a call from Karyn who said this time she made it she just soaked the matzo farfel quickly before putting it on top ( which is such a good idea) just to soften and she also made it with just 1 cup of sugar! and it came out perfectly so I am changing this recipe to 1 cup not 2 cups of sugar.

*you can substitute margarine for butter if you want to with no problem here

Ingredients:

Apple Ingredients:

3 cans of cranberry sauce (use whole cranberry sauce)

1 tsp. cinnamon

1 cup sugar

6 cups chopped and peeled apples (I usually use granny smith but feel free to use any kind you like or whatever you have in the house)

1 tsp. salt

Topping Ingredients:

1 1/2 cups sugar

4 cups matzoh farfel (pour hot water on it in the bowl and after you fill it up put a plate over bowl and pour the water off ) it is just to soften

1 cup butter, melted

1 tsp. salt

Directions:

Preheat oven to 350 degrees. (You can also pre-assemble, refrigerate and cook day of. Or you can cook halfway which is what Karyn and I do, and then freeze. Then defrost the night before you’re using it and cook.)

Peel apples and chop. Spray baking dish with Pam. Mix apples, cranberry sauce, 2 cups of sugar, and 1 tsp. salt together in a bowl, then place in sprayed baking dish. Use whatever dish you like enough to place right on table.

In a separate bowl, mix 4 cups matzoh farfel, 1 1/2 cups sugar, 1 cup melted butter (or margarine), and 1 tsp. salt. When well mixed, put on top of apple mixture and bake at 350 until bubbly (about 55 minutes).

Passover Popovers

Super easy , super light and delicious. Give this one a try. These are delicious during Passover with some preserves for Breakfast as well as with your Seder Meal. Enjoy and Happy Passover Cooking from my kitchen to yours. I used a muffin tin and it worked out perfectly. Bake these light airy treats for your Seder to rave reviews. One per person is perfect , this recipe yielded 9 popovers. photo20130321-113701.jpg photo

Ingredients:

1 cup cake meal

4 eggs — always work with room temperature eggs unless otherwise stated for best results

1 tsp. salt

1 Tbsp. sugar

1 cup water

1/2 cup peanut oil

Directions:

Preheat oven to 400 degrees.

Mix the cake meal, salt and sugar in a bowl.

Bring oil and water to a boil, add cake meal mixture and remove from stove.

Beat in one egg at a time and mix a lot. It will be thick.

Allow to stand for 15 minutes.

Drop into a well-greased muffin or popover tin using a tablespoon to 3/4 full. I spray with cooking spray . I used a Canola Oil baking spray, or lightly grease pan with canola oil.

Bake at 400 degrees for 35 minutes till medium golden brown. I placed pan in the center of the oven .

Warm before serving if desired.


Judy’s Apple Matzoh Kugel for Passover

DSCN2653

photo (37)DSCN2642DSCN2539

If you ask me, kugels are the best part of Passover. Put together in a casserole dish these sweet and savory dishes are my absolute favorite dish on the Seder table.  It was always about the kugel with me from the time I was a kid. This is an awesome recipe from a family friend which came to me via Karyn, so thanks Judy and thanks again Karyn. I used to make this recipe all the time and over the years I replaced it with something else and completely forgot about till another friend asked me for the recipe. Karyn came to the rescue. This is a delicious sweet addition to the table and if I remember correctly everyone loved it. It is easy and not too many ingredients and hardly any steps at all. Enjoy!

Plan ahead:

Kugels can be made a day or two ahead. On the day of the serving, allow the dish to come to room temperature. Then heat it, covered in a preheated 350 degree oven until warm, 30 – 40 minutes. My experience has always been that the kugels hold together better when they are pre-made.

Ingredients:

12 sheets matzoh

9 eggs beaten, use eggs at room temperature

1 1/2 tsp. salt

1 1/2 cups sugar

6 large apples, peeled and sliced (any kind will do)

3/4 cup vegetable oil

3 Tsp. cinnamon

1 1/2 cups white raisins

Directions:

Preheat oven to 350 degrees.

Break matzoh into colander and run warm water over it, just to soften, then drain and put in a large bowl. Add beaten eggs, add salt , sugar , apples, oil, cinnamon and raisins and pour into a pre-greased ( or cooking sprayed) baking dish . Bake at 350 degrees for 50 minutes.

Bake at 350 degrees for about 50 minutes. Enjoy!

*first time baking it keep it uncovered, when you re-heat you will cover it so it doesn’t dry out.